Saturday, December 6, 2014

Katia Anagnostaki... The Royal in cookies...


Katia Anagnostaki... The Royal in cookies... In fact in decoration of cookies. Because every decorated cookie is a masterpiece... A detailed art.
For me using royal icing is not difficult to handle. It needs practice of course. And I admire many people who chose to use it. But when I see someone really experienced in making a cookie looking like a painting, I stop being only impressed... I want to meet the person, the way she works, her ideas, discover the artistic aspect of it and see the personality behind. So I am really glad to host today Katia. 

Let's find out who's Katia...

I am Katia, a married 37 year old woman and a mother of two toddler boys. I have studied Biology, my thesis was focused on Developmental Genetics in the Institute of Molecular Biology and Biotechnology in Heraklion, Crete. My postgraduate studies, MSc, were on Environmental Managment at the Technological University of Crete in Chania. I am a Biology teacher for the past 14 years. Since I was a little girl I loved crafts so I know how to sew and knit but sugar art stole my heart 2 years ago when I started decorating cookies as a hobby and started my facebook page GK Cookies. After that, the blog gkcookies.com followed and recently I started my journey as a cookie decorating tutor at sugar art seminars.


What made you work exclusively with cookies art? How did you start?
The first time I decorated cookies was for my eldest son's baptism. I asked for decorated cookies at local bakeries and I found cookies without any frosting and some multicolor confetti on them for 3euros/cookie. So I decided to make them my own. That's how I started. The first time I didn't know even how to make royal icing. I found a recipe without any instructions and I experimented while I was decorating over 100 cookies for the baptism... When I first took a pastry bag in  my hands it was very easy and natural for me. When I was expecting my second son I searched for some specific cookie cutters and that leaded me at an e-shop in US that had a section for inspiring cookie decorators. I visited the blogs of CookieCrazie and Sweet SugarBelle as well as Cookie Artisan's flirck page. From the last one, I choose a set and challenged myself that if I could be able to decorate it decently then I would continue to deal with cookie decorating. As you can understand I decorated them successfully! 


Have you attended seminars or had a teacher? Are you following tutorials or blogs/sites?
No, I haven't attended any seminars. You know, for some people it is efficient to read instructions or just use their imagination while others prefer to attend a seminar from a tutor. I think that it's a matter of personal preference. Cookies are more challenging for me because of their small size in comparison with a cake. I like playing with details. I think that this might be because I was used to work for hours with tiny creatures in front of a stereoscope during my thesis in developmental genetics.
I follow several blogs like SugarBelle's and Sweetambs's as well as I read books on cookie decorating or royal icing.


What do you think makes a cookie an absolute success?
Well, this question is a difficult one cause I really haven't figured out what people like the most on a cookie...technically advanced decorated and very well executed or just an impressive cookie?


How do you see the international market in cookies art? Would you like to name some on the top of your personal list who "dominate" in this business?
My opinion for the cookie decorating field is that is much alike Hollywood with some big stars and lots of smaller ones. I am amazed by the piping and painting skills  of the European decorators although they are not so well known as the Americans, which are very talented also. You ask about business...I will answer about talent. I love the art of Evelin Decora, Aniko Vergane Orban and Mezesmanna...They are of course many others very talented in Europe but these are the ones that keep me with the jaws on the floor! I also love Arty MacGoo's cookies because they combine art, fine taste and multiple techniques.


How is greek market of cookies?What is according to you the level of cookies artists in Greece and how easy is to compete with others abroad?
Decorated cookies aren't as popular in Greece as they are abroad. The past few years they became known and people keep asking for decorated cookies in several occasions. Many people decorate cookies in Greece but because of the economic crisis they underestimate their value. People don't know how much time, effort and equipment is needed for decorating cookies. After all, cookie decorating is art so it cannot be sold keeping in mind only the cost of the ingredients... As far as the level of Greek cookie artists I think that there are many of them, especially using fondant as a medium. There are fewer that decorate with royal icing. They are talented and promising considering that royal icing is a new decorating medium in Greece.


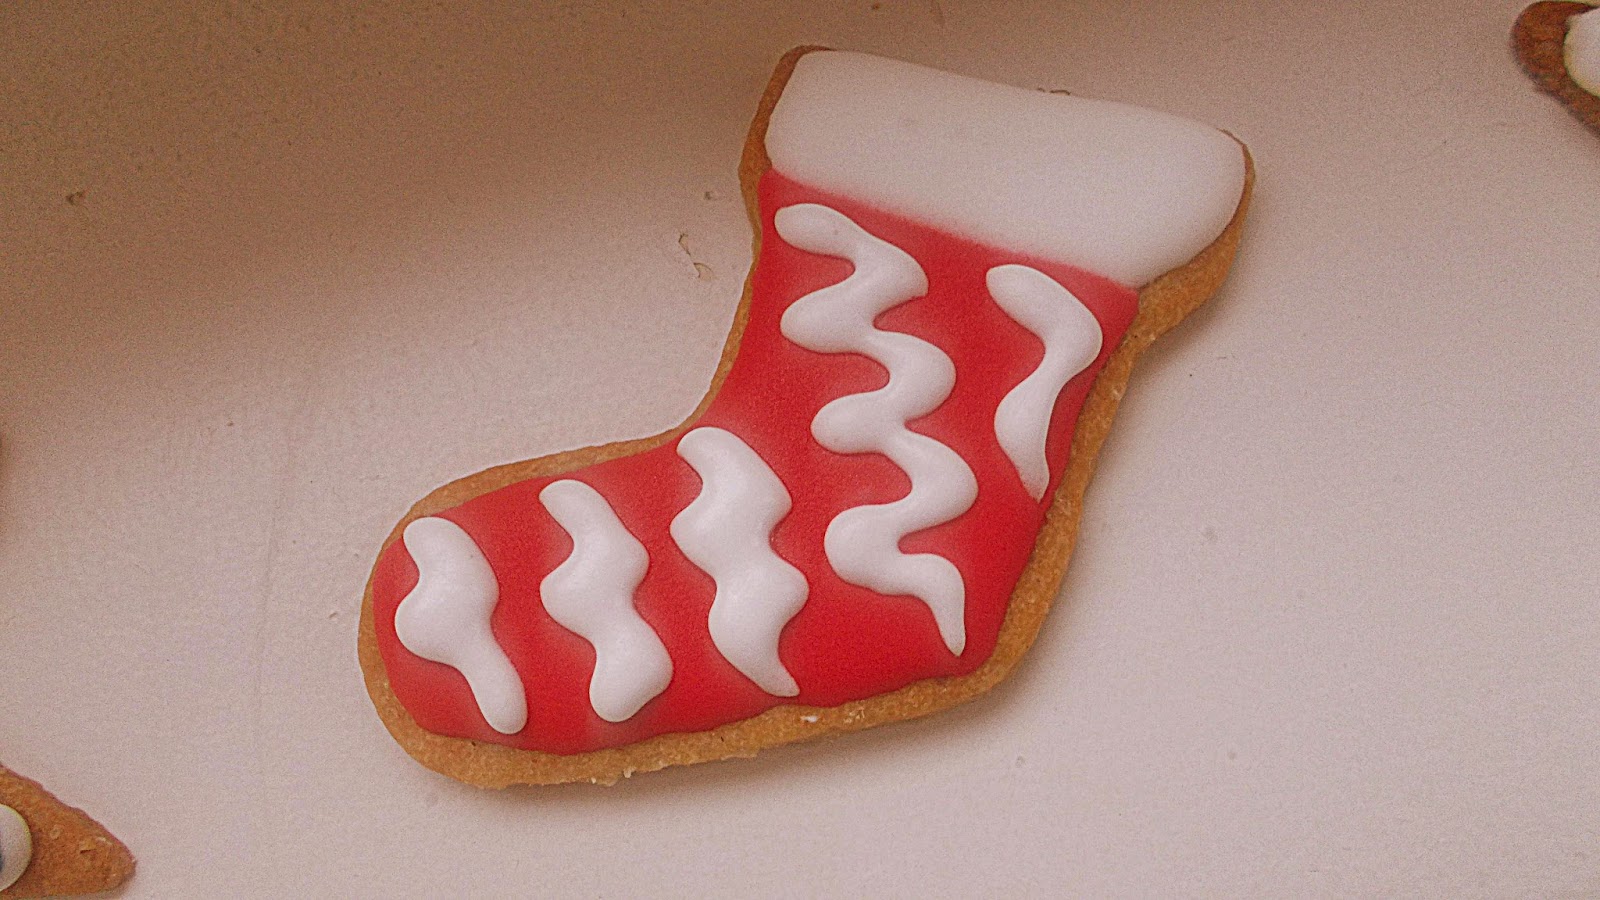
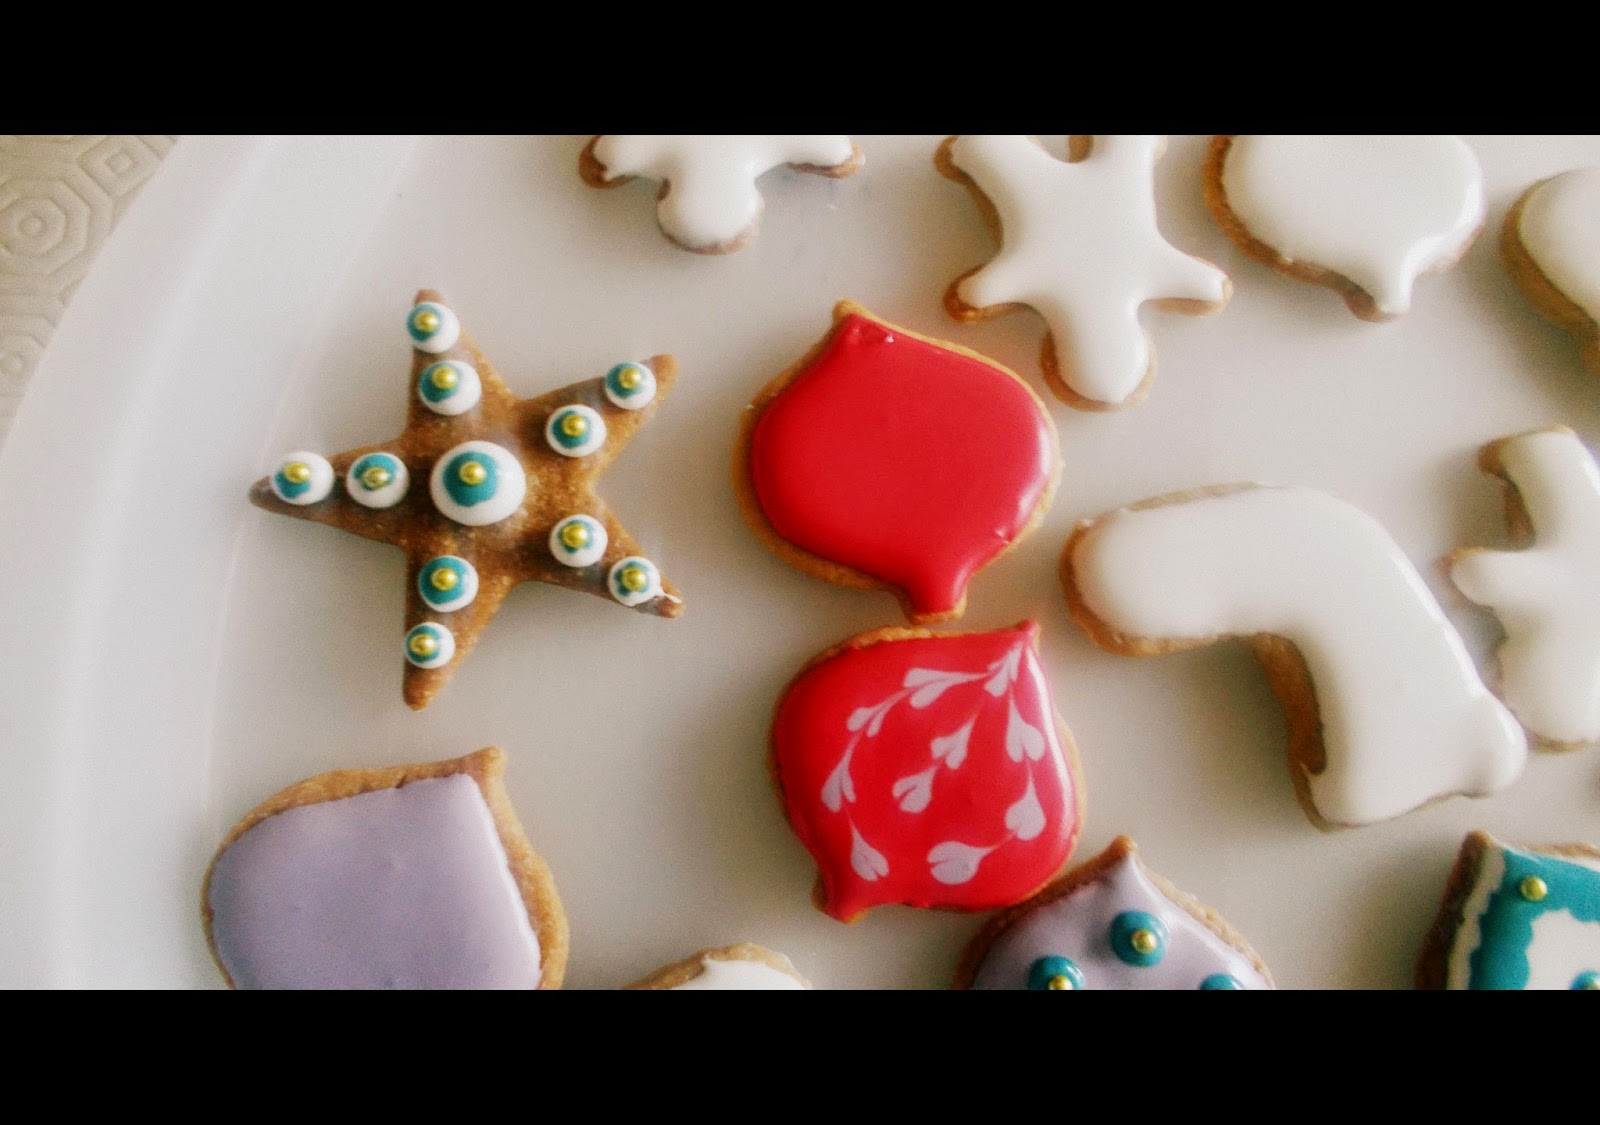
I see that you work with royal icing to make your unique designs. Why instead of sugar paste?
I love decorating with royal icing cause I have the freedom of creation. There are endless possibilities of decorating designs using a pastry bag. I work with sugar paste also but not so often. Each medium has its own pros and cons, for example I love the dimension that fondant gives not to mention the fact that much less time is needed to decorate an average cookie using fondant! Its a
medium that speeds up decorating process as it requires minimum drying time!


How difficult is to work with royal icing? Any tips for beginners?
I don't think that it is difficult to work with royal icing. If you love it and have patience then practice makes perfect! The only tip I could give to beginners is that the first thing they have to master is royal icing consistency and practice a lot!


In pastry there are many recipes of cookies to bake. What kind of recipe should we search to make the perfect base for decoration?
In my preference, the perfect cookie recipe should yield cookies that meet the following requirements: they do not spread, have a level surface (especially when decorated with fondant) and taste delicious of course!!!


What was the most difficult cookie that you had to make?
By far the most difficult cookies I made were my first one cause I didn't have an idea of how to decorate them!


Apart from running your extraordinary site with interesting tips, tutorials, recipes and beautiful pictures of you, you are also creating cookie cutters. Really beautiful ones. How did you start making them? What's the difference of your cutters comparing to the ones we can easily find in commerce? Are you interested in selling them? Even abroad? 
Cookie cutter making started as a need for me. I have hundreds of them that I bought from US and I was really tired of waiting my order to arrive plus the  high shipping costs. So I decided to start making my own. It was very difficult at the beginning but as time passes and experience grows I create more complicated and demanding designs. As with my cookies, with cookie cutters I am emotionally attached. I first have to like the design in order to want to make a cutter even not needing it for a specific cookie project. The major difference between my cutters and commercial ones is that they are handmade and made from food grade stainless steel. That being said the cutters that I create are more stable and durable than those made from tin or plastic and of course lower cost from the copper ones.


Finally what do you think, decorated cookies should be eaten  at the end or only remain decorating our home?
I have heard many people telling me that they wouldn't even think of eating one of my cookies but cookies are made to be eaten, aren't they?   That's all about temporary art. Although, I keep lots of different designs in my freezer...


As you see Katia is not simply a person who's creating art in a cookie. In fact she's an intellectual, well standing woman, whose creativity is inspiring and art is touching. And she proves definitely that when you love what you do, you explore your possibilities, discover your tools and extend your artistic aspect,while creating until you are satisfied... 

But what I see in Katia as well is that she loves working in many projects at the same time. Multitalented, dynamic, self-confident and hard worker. She does not care about the number of cookies to produce, all that matters is the quality result... And that's what counts, indeed.

In September I reached Katia's seminar. A very detailed very joyful and explanatory seminar about the art of decorating with royal icing. She made a great work as a teacher and I would definitely recommend you to stay tuned in her page, and check out about available dates of seminars to attend and who knows? Probably in the future you will be a new revealed talent in cookies decoration. With such teacher you are definitely on the right road.... :)


Thank you Katia for sharing this interview, I am really honored to have you today and wishing you all the best for your bright future in this really amazing art of decoration!

Check out some remarkable designs in cutters by Katia:


Love,
Les Delices d' Eleni


Thursday, December 4, 2014

Cookies decoration with royal icing: Second part

Here is the second part with my second day of cookies decorated with royal icing. I admit that it is the first time that I have worked two consecutive days in the same project because:

I wanted to check the density of my royal icing the next day.
I wanted to check the colors from previous day
I wanted to try this time the whitening option of decoration.

And I figured out that:
My royal icing was fatter in consistency than the previous day. 
Colored royal icings (even designs made from previous day) were more tense. 
The previous day, I reserved it on the fridge by applying cling film in the whole surface of the icing in full contact. This helps the royal icing to be reserved without being dry....

In the pictures below I have tried to work as much as I could with the outline. I have tried as well to make the outline by positioning my hand a little high in a way to provide continuity in the white line designing. Sometimes it worked well and some others not so well. Stable hand and good density of royal icing are fully cooperative.   


Pay attention as well when you touch your cookies still wet... It is easy to mistakenly touch it. So don't forget that you always deal with a delicate action and you shouldn't waste all this effort (yeap! I did some mistakes as well!!!!) So make sure that your cookies are dry.


And the most important notification: living in north in a dry season, I realized that my icing got easily dried in less than 24 hours. Ideally though it is better to work along your decorations many days before in order to be sure that even if you have to decorate your cookies in two or three different stages, every stage is fully completed.

The most important think you should always remember is practicing. It is not that difficult to work with royal icing but you have to practice. Your inspiration will assist you in designing your cookies and cakes but follow as well the experts of it for tips. In my blog I will have the opportunity to interview experts in the royal icing so don't forget to always check our "interviews" chapter....

Love,
Les Delices d'Eleni


Wednesday, December 3, 2014

Cookies decoration with royal icing


Royal icing decoration is a special technique that is used to decorate cookies, cupcakes even simple cakes. Based on the whites of eggs and powdered sugar you just make a creamy mixture which is an icing to be used most preferably in icing bags and with various nozzles.
What is mainly important while using royal icing is your hand's stability to act. The main purpose while using the icing, is to manage covering successfully the entire part of a cookie, Further to this and following the talents that each one hides, you could even draw with the icing... There are artists doing miracles with it.
I wouldn't consider myself as a person who has used a lot the icing to decorate. But recently and after a very interesting seminar with the GK cookies author, I realized that I would like to explore my talent on it so I promised myself to work with royal icing more often in the future. It's true that decorating with sugar paste is easier and sometimes quicker definitely but the artistic result that the royal provides is unbelievable. Especially when you ofter use it.
After having baked your own cookies (you may find my recipe for cookies in this blog), make your Royal Icing recipe (link extracted from GK cookies, where you will find as well many tutorials and techniques to use with the royal icing). Pay attention to the details of the recipe concerning the density of your mixture produced.

You will need small bowls to mix colors, water drops to control the liquidity of your icing depending on how you wish to use it. You will need short icing bags and nozzles. In fact thin nozzles.
I would consider all the below instructions mostly as tips. Following the way I used it so far I am giving you my personal experience and ideas about making cookies with royal icing. I do believe that seminars and some educational tutorials would enable you as well to work finely with this incredible mixture.

For making colors I use paste colors. You have to generally pay attention because color reaction is not the same like in sugar paste. What I mean is that, after a while, colors become stronger and tense, so depending on what you basically wish to have as result, try to apply at first with a toothpick a really small quantity of color to your icing, mix with a spoon and see what it produces. Let it react for at least some time. Even half an hour. If you wish to have it really tense then add a little more. 

If it is the first time you make and use royal icing, I would suggest you to always have with you kitchen paper, a simple syringe with water in order to drop water a whilee (when you need your icing to be a little bit more liquid), many toothpicks to "play with colors", different nozzles and icing bags (you can easily find on various sites with paste material on the internet or special shops dealing with sugar paste and pastry). When you are organized with all these little tools then you can easier work with your designs. A tip for those who have no bags or nozzles and wish to cover simply with royal icing their cookies (like the two little snowmen below): you could use a little spoon as well. Very elegantly and slowly try to cover the top area of your cookies (starting from the edges and then covering the inside), without living spaces and at the same time trying to have same density in the whole top surface. If you don't use the same quantity of royal to the surface, while hardened it will show inbalanced coverage. That's why it's better to have icing bag and try to work with it instead of a spoon. Unless you wish to try simple at your beginning.
Initially what you need first before fully covering, is to create an outline. This will assist you in your next step to color your cookie on the inside of the surface.
While applying the royal icing on the total surface, it is possible to have some gaps here and there. It is normal. All you can easily do is use a toothpick and try to cover with the color surrounded the empty short points. At the end, shake your cookie with the icing. This will enable all surface to have equal quantity of icing and look fully covered. 
In case your royal icing is running from the edges of your cookie, this means either you cover with a lot your surface or your icing is too liquid. In such case you have options: you can take off all the icing covered and restart after having well cleaned the surface with a paper. Another option is to try with a toothpick to give a shape by collecting from the edges and the sides the remaining icing dropped. If your icing is still dropping then is too liquid. 


And yet, if you are expert or if you wish to make something different hopefully you still have time till Christmas to order these amazing stencils exclusively fabricated by Evil Genius (Gateaux Inc).
I used them for the first time and to be honest I adored them. Easy to use, amazing result. In fact, what you see is applied with red color on sugar paste. With a simple vintage result, you may impress your friends and family and make your own little sweet memories on table... Check out their site and e-shop or check on facebook the easiest ever technique to use them. I will definitely order some more stencils to use the next months...


So this is one part of royal icing used in cookies. As you above see designs are not all ready yet. This means that you should wait for the second part... :)
It's not difficult to use the royal icing. But it definitely needs to work on the technique and stability of hand.

Love,
Les Delices d' Eleni

Tuesday, December 2, 2014

Madeira cake


I was wondering what it could be such cake that many people use in sugar art. It is considered as one of the most stable ones to be used for 3d design, ideal for sculpture. I decided to make one today by using the recipe of my teacher Nicky Lambrinou also available at sugar flowers creations along with an interesting sculpting recipe...


Ingredients
250 gr butter (room temperature)
250 gr sugar
6 large eggs
90 gr self rising flour
180 plain flour (sifter both flours in one bowl)
1 table spoon fresh milk
Vanilla extract or 1 little dose of vanillin powder

You may execute the recipe like a normal cake that you make.
Preheat the oven to 170 degrees (Celcius) in resistances,
First mix well the butter with the sugar until well incorporated and be white. Then add one by one. Don't add them all together. The purpose is to add each egg and mix to fully incorporate them in the mixture. Then add the milk, the extract and one table spoon of flour and mix again. In low speed add spoons of flour sifted and mix. Place in a dish (most preferably I would not recommend this time silicone, instead one of your regular dishes buttered and floured all aroung and in the bottom will be just fine).
Bake for 45 minutes and then with a wood stick check in the center of your cake whether it is baked by sinking it until the bottom. If you withdraw it clean without remains, your cake is ready. Otherwise bake for another 5 minutes.


Tips:
  • I found out by sugar artists that this cake is heavy and doesn't create crumbs while you sculpt or create a 3d cake. Nevertheless I have another idea in mind so stay tuned in my blog to find out how a cake can be a delicious dessert for special occasions.
  • You can extracts or fruit zests for a stronger more defined taste. In this particular one I have used vanilla extract.
  • This cake can be easily cut in layers once you let it for 24h before using it...
Enjoy,
Love,
Les Delices d' Eleni


Cookies (sables)

Cookies: kids love them, we use them to decorate in Christmas and other festive periods out table. We bake them to treat in parties, in birthday occasions, even to offer as present in a beautiful gift box. In fact I trully believe that cookies are a delice for any age so don't be just tempted... bake them! And these ones have three different kind of sugars to bring a nice taste, in fact not too sweet.

Ingredients:
250 gr butter (room temperature cut in little cubes)
75 gr sugar
150 gr brown sugar (soft)
150 gr black sugar (soft)
1 large egg
little salt
2 table spoons of milk
500 gr sifted plain flour
Vanilla butter extract

Start mixing sugars and butter to be homogenized for 2 minutes.
Add the egg and continue mixing in medium speed. Then add the spoons of milk and the vanilla extract and continue mixing for a few seconds.
Before mixing the flour, put the mixing hook on your mixer. Then mix in low speed in order to maintain a thick mixture fully and well homogenized. In case some remains of ingredients exist in the mixer's edges, continue mixing with your hands.
Use a cling film to cover your dough and let it on the fridge for minimum half an hour. 
Preheat the oven to 165 degrees (resistances).
With your rolling pin open the dough and make little designs with cutters of your taste. PLace them in a plate oven dish with a little/short distance between them. Bake them for 20 minutes maximum (in case you don't want them too crunchy low minutes to 15)


Tips:
  • Ideal for decorations. They don't spread within the baking process and keep well for many many days. At least 2 weeks I would say.
  • Depending on the cutters you use, you could as well melt chocolate and cover them. Lovely and ... delicious.
  • In order to always reserve them fresh, keep them in a closed metallic bowl. They will keep freshness for at least two weeks as mentioned. Even more!
  • You may add spices that you like, For example for this quantity of recipy you could add 1 tea spoon of cinnamon powder, one quarter of tea spoon ginger powder.
  • You may try as well orange or lemon zest (approx 1 table spoon minimum to add).
  • Make your own combinations of flavors according to your taste, by using various spices and extracts (coffee, almond, vanilla, chocolate, or fruit extracts).
Enjoy,
Love,
Les Delices d' Eleni